In the last chapter, we started working on AutoML for tabular data. This chapter continues with the AutoML section for images and text data, followed by step-by-step instructions for images and text data. GCP also provides pre-built models, and this chapter covers them in brief. This chapter also talks about the benefits and limitations of AutoML, in brief.
In this chapter, we will discuss the following topics
- Vertex AI AutoML for image data
- Image dataset creation
- Image model training
- Image model evaluation
- Batch prediction for image
- Model deployment for online predictions for image
- Serving online predictions image
- Vertex AI AutoML for text data
- Text dataset creation
- Text model training
- Text model evaluation
- Batch prediction for text
- Model deployment for online predictions for text
- Serving online predictions text
- Pre-built models in GCP
- Benefits of AutoML
- Limitations of AutoML
By the end of this chapter, you will be able to create datasets, train the AutoML model, obtain batch predictions, and deploy the models for online predictions for images and text data. Also, get introduced to pre-built models of GCP.
Vertex AI AutoML for image data
AutoML for images can handle tasks of single-label, multi-label classification, object detection, and image segmentation. For the practical exercise of the AutoML for image single-label classification we are using boat classification image data which can be downloaded from below mentioned link:
https://www.kaggle.com/datasets/imsparsh/dockship-boat-type-classification
The dataset is listed under CC0: Public domain license and contains images belonging to nine categories. For our exercise, we are considering images belonging to cruise ships, ferry boats, and kayaks (50 images are chosen randomly from each category).
AutoML_image_data bucket is created under us-centra1 (single region) and three folders containing images belonging to three categories are uploaded. An additional folder is created in the bucket by the name Data_for_batch_pred which contains a randomly chosen image for batch prediction. A snapshot of the cloud storage is shown in Figure 3.1:
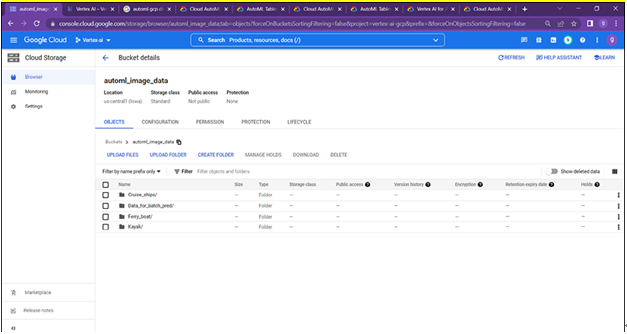
Figure 3.1: Image data uploaded to cloud storage
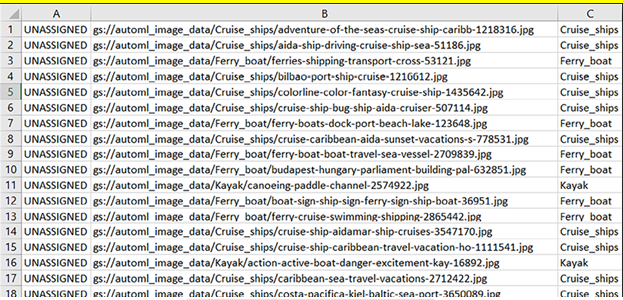
The steps for working on the AutoML image data are like AutoML tabular data with few changes while creating the dataset and model training. In the case of tabular data, we were able to directly create a dataset with the ‘.csv’ file uploaded to the cloud storage, but the in case of image data, users need to create a csv that contains information about the image belonging to the training/validation/test, the full path of the image and the category it belongs to.
While we are dealing with only 150 images belonging to three categories, it will be easy to create csv manually with the required information. But if we are dealing with many images, manually creating a csv is not a feasible solution. But a few lines of commands on the cloud shell will make it easier.
for f in $(gsutil ls gs://AutoML_image_data/Cruise_ships/); do echo UNASSIGNED,$f,Cruise_ships;done>>class_labels.csv
for f in $(gsutil ls gs://AutoML_image_data/Ferry_boat/); do echo UNASSIGNED,$f,Ferry_boat;done>>class_labels.csv
for f in $(gsutil ls gs://AutoML_image_data/Kayak/); do echo UNASSIGNED,$f,Kayak;done>>class_labels.csv
These commands will create a csv file that contains three columns:
- Setting an image to train/validation/test. In our case we have used the “UNASSIGNED”, platform will choose images for training, validation, and testing.
- Full path of the images
- The category it belongs to.
Use the following command to push the CSV file to the cloud storage bucket:
gsutil cp class_labels.csv gs://AutoML_image_data/class_labels.csv
Open the command shell and type the commands as shown in Figure 3.2:
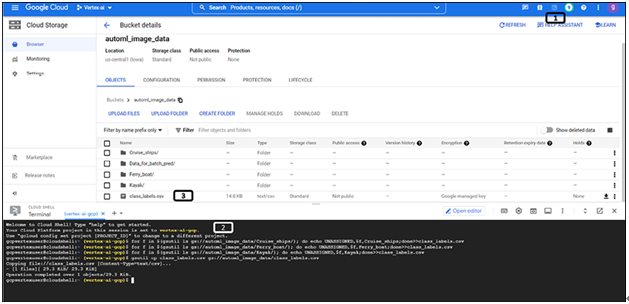
Figure 3.2: gs commands for csv creation (image data)
- Click on the icon to open the cloud shell.
- Type the commands (type one command and press Enter).
- New CSV is created and is available in the cloud storage.
A snapshot of the CSV file created is shown in Figure 3.3: